
| 일 | 월 | 화 | 수 | 목 | 금 | 토 |
|---|---|---|---|---|---|---|
| 1 | 2 | 3 | ||||
| 4 | 5 | 6 | 7 | 8 | 9 | 10 |
| 11 | 12 | 13 | 14 | 15 | 16 | 17 |
| 18 | 19 | 20 | 21 | 22 | 23 | 24 |
| 25 | 26 | 27 | 28 | 29 | 30 | 31 |
- switch
- Realm
- http
- 폰트
- TMDB
- swipe
- API
- ios
- Crashlytics
- 알고리즘
- enum
- 프로그래머스
- Xcode
- flatMap
- 회고록
- SwiftUI
- struct
- LeetCode
- 개발후기
- SF 폰트
- Firebase
- dfs
- optional
- viewcontroller
- FSCalendar
- RxSwift
- ios13
- Lifecycle
- typecasting
- Swift
- Today
- Total
Jerry's Bakery
[iOS/Swift] FSCalendar Swipe(스와이프)로 크기조절하는 방법(애니메이션 효과 적용) 본문
안녕하세요 Jerry입니다.
iOS에서 스와이프로 FSCalendar 크기를 조절하는 방법에 대해 알아보겠습니다.
iOS를 공부하면서 정리하는 것이기 때문에 미흡한 점이 있을 수 있습니다. 부족한 점에 대해 댓글 남겨주시면 감사하겠습니다.
본 글에 사용된 Xcode와 라이브러리 버전은 아래와 같습니다.
| 버전 | |
| Xcode | 13.0 |
| FSCalendar | 2.8.2 |
| Simulator | 15.0(iPhone 13 Pro Max |
FSCalendar 공식 주소는 아래와 같습니다.
GitHub - WenchaoD/FSCalendar: A fully customizable iOS calendar library, compatible with Objective-C and Swift
A fully customizable iOS calendar library, compatible with Objective-C and Swift - GitHub - WenchaoD/FSCalendar: A fully customizable iOS calendar library, compatible with Objective-C and Swift
github.com
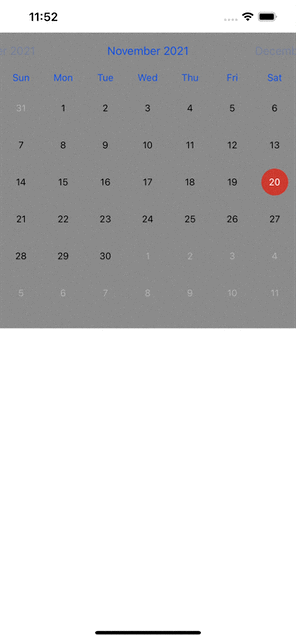
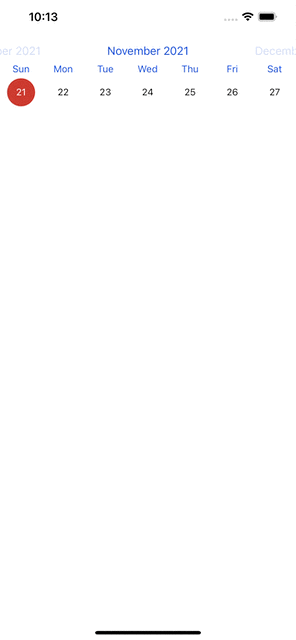
글을 시작하기에 앞서 구현하고자 하는 화면을 먼저 확인하겠습니다.

기본 설정
FSCalendar라이브러리가 설치되어 있다는 가정하에 설명하겠습니다.
프로젝트를 생성해, 뷰 컨트롤러에 UIVIew를 추가하고, UIView를 커스텀 클래스로 연결합니다.

커스텀 클래스를 연결한 후, 제약조건(Constrains)을 아래와 같이 설정합니다.
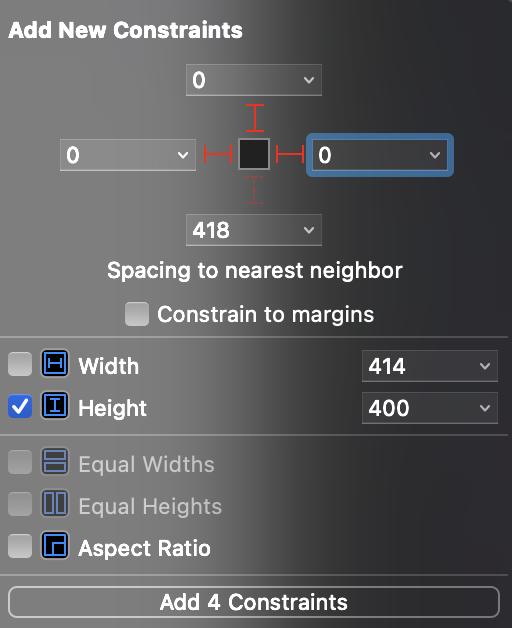
제약조건을 설정한 후 아까 설정해두었던 Height 제약조건을 아웃렛 연결을 수행하겠습니다. 변수 이름은 calendarHeight로 설정하겠습니다.

FSCalendar 실행
뷰 컨트롤러에서 아래와 같이 코드를 작성합니다.
아래 코드에서 calendar.scope는 캘린더가 한 달 단위로 보여줄지, 일주일 단위로 보여줄지 결정할 수 있으며 기본값은 한 달 단위입니다.
앱을 실행하면 아래 그림과 같이 출력되는 것을 확인할 수 있습니다.
import UIKit
import FSCalendar

class CalendarSwipeViewController: UIViewController {

    @IBOutlet weak var calendar: FSCalendar!

    @IBOutlet weak var calendarHeight: NSLayoutConstraint!

    override func viewDidLoad() {
        super.viewDidLoad()

        calendar.delegate = self
        calendar.dataSource = self

        // 한달 단위(기본값)
        calendar.scope = .month
        // 일주일 단위
        calendar.scope = .week
    }
}

extension CalendarSwipeViewController: FSCalendarDelegate, FSCalendarDataSource {

}

FSCalendar 스와이프로 높이 조절
캘린더가 잘 나오는 것을 확인하였으니, 스와이프 설정을 해보겠습니다.
viewDidLoad 함수에 UISwipeGestureRecognizer를 추가합니다. UISwipeGestureRecognizer는 사용자가 스와이프한 방향을 인식할 수 있습니다. 공식 문서는 아래 링크를 참고하시면 됩니다.
Apple Developer Documentation
developer.apple.com
이 글에서는 스와이프 하는 방향은 위, 아래만 있기 때문에 viewDidLoad함수에 아래와 같은 코드를 추가합니다.
let swipeUp = UISwipeGestureRecognizer(target: self, action: #selector(swipeEvent(_:)))
swipeUp.direction = .up
self.view.addGestureRecognizer(swipeUp)

let swipeDown = UISwipeGestureRecognizer(target: self, action: #selector(swipeEvent(_:)))
swipeDown.direction = .down
self.view.addGestureRecognizer(swipeDown)
UISwipeGestureRecognizer에서 action을 selector로 연결해주었기 때문에 @objc 함수를 아래와 같이 추가합니다.
@objc func swipeEvent(_ swipe: UISwipeGestureRecognizer) {

    if swipe.direction == .up {
        calendar.scope = .week
    }
    else if swipe.direction == .down {
        calendar.scope = .month
    }
}
그리고 extension에 아래와 같이 메서드를 추가합니다.
extension CalendarViewController: FSCalendarDelegate, FSCalendarDataSource {
func calendar(_ calendar: FSCalendar, boundingRectWillChange bounds: CGRect, animated: Bool) {
calendarHeight.constant = bounds.height
}
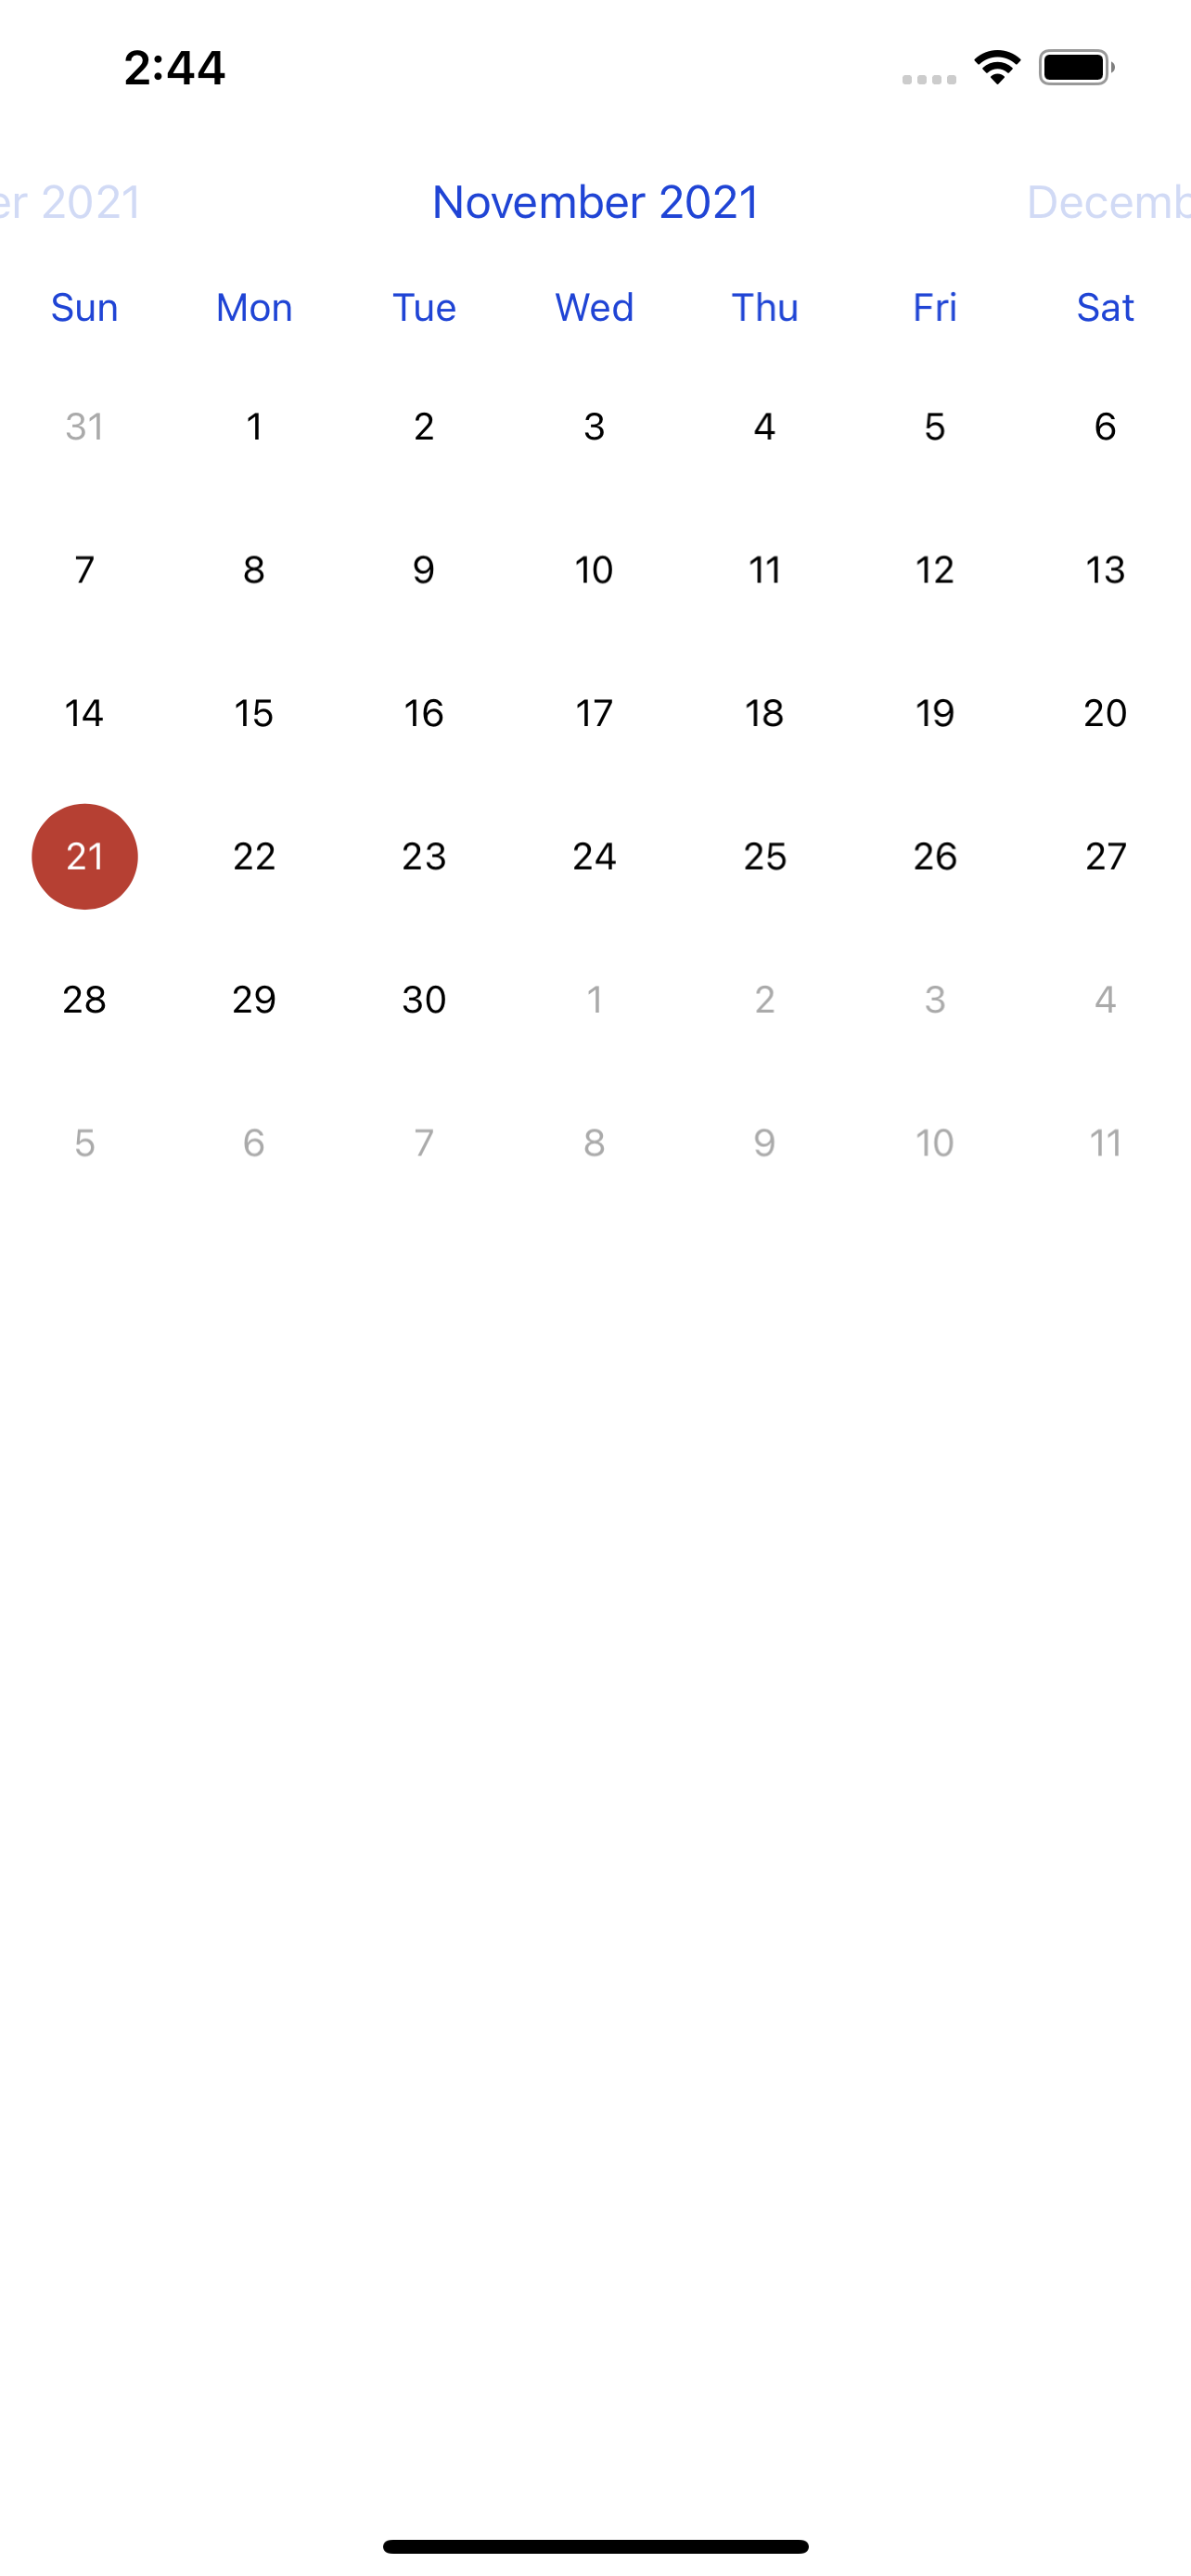
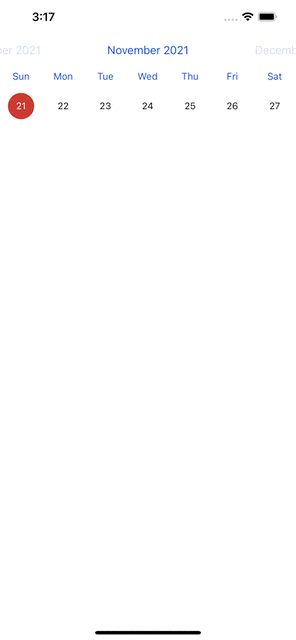
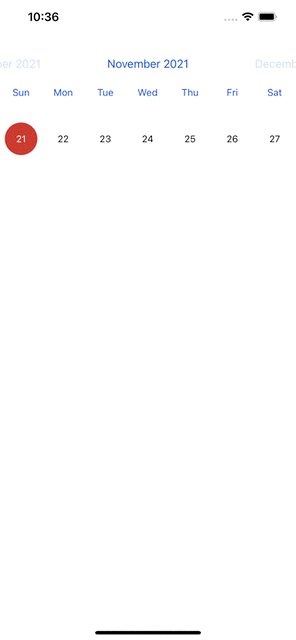
}아래로 스와이프 했을 때는 월 단위로, 위로 스와이프 했을 때는 주 단위로 보여줍니다. 그 후 앱을 실행하면 스와이프에 따라 보이는 화면이 달라지는 것을 확인할 수 있습니다.
애니메이션 효과 적용
이제 애니메이션 효과를 적용해보겠습니다.
위에서 #selector로 연결한 @objc 함수인 swipeEvent를 아래와 같이 수정합니다.
@objc func swipeEvent(_ swipe: UISwipeGestureRecognizer) {

    if swipe.direction == .up {
        calendar.setScope(.week, animated: true)
    } else if swipe.direction == .down {
        calendar.setScope(.month, animated: true)
    }
}
그리고, extension에 구현했던 메서드를 아래와 같이 수정하겠습니다.
extension CalendarViewController: FSCalendarDelegate, FSCalendarDataSource {

    func calendar(_ calendar: FSCalendar, boundingRectWillChange bounds: CGRect, animated: Bool) {

        calendarHeight.constant = bounds.height

        UIView.animate(withDuration: 0.5) {
            self.view.layoutIfNeeded()
        }
    }
}
전부 수정하고 앱을 실행했을 때 애니메이션이 추가된 것을 확인할 수 있습니다.
만약 달력 크기를 전체 화면으로 수정하고 싶다면 아래와 같은 과정을 수행하면 됩니다.
viewDidLoad에서 calendarHeight를 화면의 전체 높이로 설정합니다.
override func viewDidLoad() {
    super.viewDidLoad()

    calendar.delegate = self
    calendar.dataSource = self

    // 캘린더의 높이를 뷰 전체높이로 설정
    calendarHeight.constant = self.view.bounds.height

    calendar.scope = .week
}
그 후, extension의 함수에서 아래와 같이 분기 처리를 할 수 있습니다.
extension CalendarViewController: FSCalendarDelegate, FSCalendarDataSource {

    func calendar(_ calendar: FSCalendar, boundingRectWillChange bounds: CGRect, animated: Bool) {

        if calendar.scope == .week {
            // 일주일 단위일 때는 높이를 맞게 설정
            calendarHeight.constant = bounds.height
        }
        else if calendar.scope == .month {
            // 한달 단위일 때는 높이를 전체화면으로 설정
            calendarHeight.constant = self.view.bounds.height
        }

        UIView.animate(withDuration: 0.5) {
            self.view.layoutIfNeeded()
        }
    }
}
모든 처리가 끝난 후 앱을 실행하면 아래와 같은 결과를 얻을 수 있습니다.
'개발 > iOS' 카테고리의 다른 글
| [iOS] Stored Property(저장 프로퍼티) (0) | 2022.02.06 |
|---|---|
| [iOS] Xcode 앱 지원 언어 한국어로 바꾸기 (0) | 2021.12.08 |
| [iOS] iOS Realm Migration(마이그레이션) 하는법 (0) | 2021.11.04 |
| [iOS] 폰트 적용하는 법 (0) | 2021.11.01 |
| [iOS] Type Casting(타입 캐스팅) (0) | 2021.10.28 |


